
Tools, General News
Knitting Calculator Bust Waist Hips Increase Decrease

Knitting Calculator to Convert Bust, Waist and Hips Increases and Decreases
BOOKMARK THIS PAGE. Use these two calculators (cm or inches) for your knitting projects if you want to vary the hips, waist and bust from a pattern. After you’ve entered your measurements, the calculator will show the new number of stitches for each measurement plus the new number of increases and decreases in between. These are based on 4 stitches change per round (ie. 2 stitches on each side marker) or 2 stitches change per row (a front or a back knitted back and forth with 1 stitch inc/dec on each side edge). It will also show you the interval between each increase and decrease. At the bottom of the calculator you can add your details and have the results emailed to you.
PLEASE NOTE – If this knitting calculator is not quite what you need, check the links at the bottom of the page for the other knitting calculators I have made.
Feel free to Contact me if you have other calculators you’d like me to add. I enjoy making them! There’s a poll at the bottom for other possibilities.
Equipment you need
- Flexible tape measure in either cm or inches
- Your gauge. Make a knitted swatch of the yarn and stitch pattern for the garment to measure 10x10cm or 4×4″
- The body you are knitting for
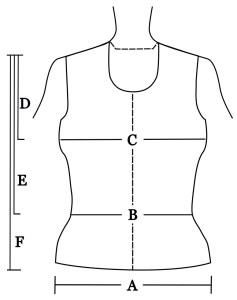
- Notepad and pen to measure the six measurements shown here (right).
Measure
- (A) Circumference of hips or the lower edge of garment at the widest point. (If you are working just a front or a back, double the width = circumference.)
- (B) Circumference of waist which is usually around 5-6cm above your belly button.
- (C) Circumference of bust at the widest point.
- (D) Shoulder to bust height – measure down the side of your bust, not over the top.
- (E) Shoulder to waist – measure down the side of you bust. NB – To add space for a bust look at the short rows calculator.
- (F) Shoulder to hips or to the lower edge of the garment (hem).
There are 2 Calculators here. This top one is in centimeters. For the calculator for Inches – scroll further down. Check the Women’s clothing size charts to help you work out standard measurements. There are more tips on getting the best results below.
Was this calculator useful?
Tips and Variations on Calculating the Increases and Decreases
- If you are knitting an A-Line or Baby Doll shape which increases from bust to hem with no waistline, leave (B) Waist width and Shoulder to Waist Height blank.
- Watching your waist? When your waist is bigger than your hips, you will find the number of increases shows as a negative number. If you don’t plan to draw the circumference of the hem in underneath the tummy, put the larger measurement in (C) Hips as well as (B) Waist. To flare the bottom edge below the tummy, add more ease to (C) Hips.
- To calculate a longer top, dress or tunic, you can add the bottom hem measurement to (A) Hips width and the full height of the garment into “Shoulder to hem”.
- When working back and forth, the calculations may give you an interval between inc/dec that is an odd number. Say for example the interval is 5 rows. I would recommend alternating so the rate of change evens out. eg – The first increase is 4 rows above, the next increase is 6 rows above, then 4, then 6 again etc.
Was this calculator useful?
Was this calculator useful?
More Calculators for Knitting
Knitting Stitch Gauge Calculator